Eonamseonsaeng's Simple Jeyuk-bokkeum (Spicy Pork Stir-fry)
This is a simple Jeyuk-bokkeum recipe that recreates the taste of famous restaurants, easy for anyone, even those living alone, to make and enjoy.
📝 Editor's Notes
어남선생 간편 제육볶음은 복잡한 과정 없이도 유명 맛집의 깊은 맛을 집에서 즐길 수 있도록 고안된 레시피입니다. 설탕, 간장, 고추장 베이스에 배 음료와 식초가 더해져 새콤달콤하면서도 감칠맛이 폭발하는 맛이 특징이에요. 특히 고기를 먼저 볶아 마이야르 반응을 이끌어내는 조리법은 평범한 제육볶음과는 차별화된 깊은 풍미를 선사합니다. 조리 시간이 짧고 설거지까지 줄일 수 있어 바쁜 일상 속에서도 든든하고 맛있는 한 끼를 원하는 분들, 특히 혼자 식사하는 분들께 더없이 좋은 선택이 될 거예요. 사계절 언제든 밥반찬이나 술안주로 훌륭하게 어울리는 메뉴입니다.
🛒 Ingredient Tips
이 제육볶음의 맛을 좌우하는 핵심 재료는 바로 신선한 돼지고기 앞다리살과 양념의 조화입니다. 돼지고기는 붉은색이 선명하고 지방이 적당히 섞여 있는 것을 선택하시면 좋아요. 핏물 제거는 잡내를 없애는 가장 중요한 단계이니 키친타월로 꾹꾹 눌러 완벽하게 제거해 주세요. 양념에 들어가는 배 음료는 고기를 부드럽게 하고 자연스러운 단맛을 더해주는 역할을 합니다. 시판 배 음료 중에서도 당분이 너무 과하지 않고 배 함량이 높은 제품을 고르시면 더욱 깔끔한 맛을 낼 수 있습니다. 고추장은 너무 묽지 않고 되직한 것을 사용해야 양념이 고기에 잘 배어들고 맛도 깊어진답니다. 좋은 고추장은 발효의 깊은 맛을 내주니 신뢰할 수 있는 제품을 선택해 보세요.
🔄 Substitution Guide
특정 재료를 구하기 어렵거나 선호하지 않으실 경우, 대체 재료를 활용해 보세요. 돼지고기 앞다리살 대신 뒷다리살을 사용하면 더 담백하고 칼로리를 줄일 수 있습니다. 닭다리살은 부드러운 식감으로 닭갈비 스타일 제육볶음으로 즐기기 좋아요. 배 음료가 없다면 사과 주스나 파인애플 통조림 국물을 활용해 보세요. 과일 효소가 고기를 부드럽게 하고 자연스러운 단맛을 더해줍니다. 설탕이나 물엿을 추가하고 물로 농도를 조절할 수도 있지만, 연육 효과는 배 음료만큼 크지 않을 수 있습니다. 고추장 대신 고춧가루 양을 늘리고 된장을 소량 추가하면 구수한 맛을 더한 매콤한 제육볶음이 되지만, 고추장 특유의 깊고 끈적한 질감은 기대하기 어려울 수 있습니다.
🥘 Ingredients
👨🍳 Cooking Points
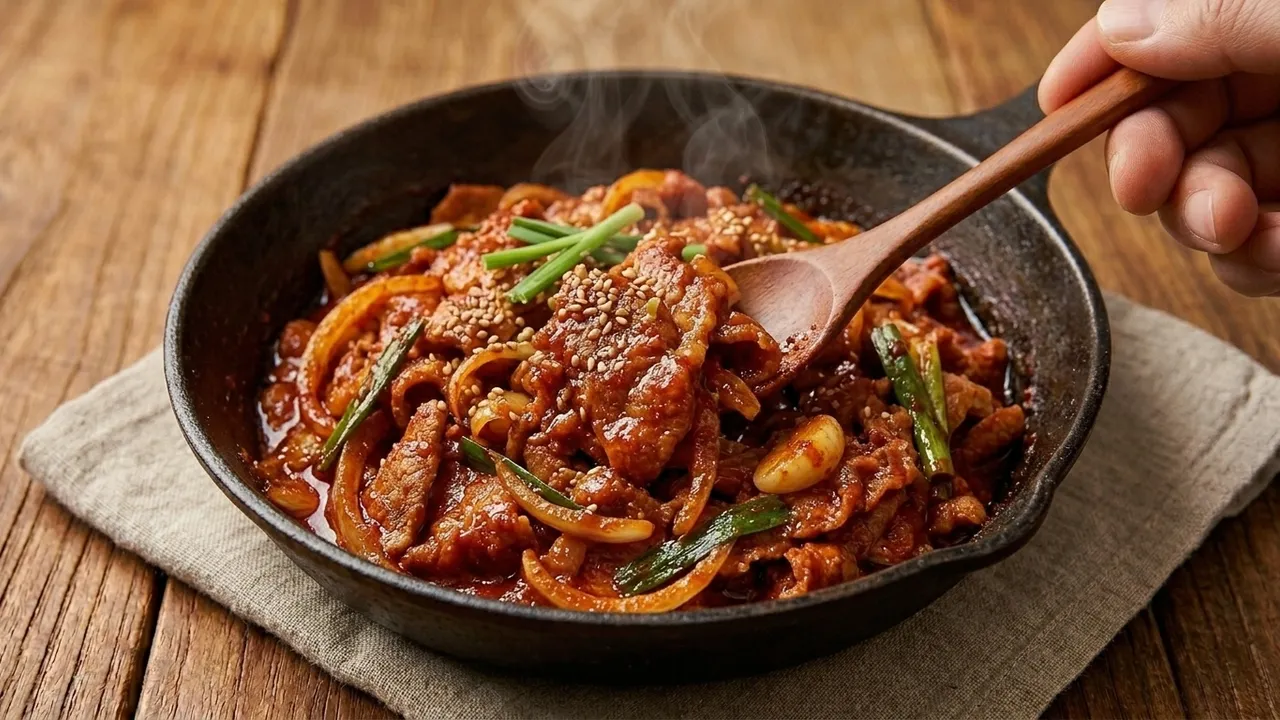
이 레시피의 가장 중요한 조리 포인트는 세 가지입니다. 첫째, 돼지고기의 핏물을 완벽하게 제거하는 것! 핏물은 잡내의 주범이므로 키친타월로 꾹꾹 눌러 제거해 주세요. 둘째, 양념을 만들 때 설탕, 간장, 고추장 순으로 넣고 흔들어 섞는 과정이에요. 설거지를 줄이고 재료들이 잘 어우러지게 돕습니다. 마지막으로, 고기를 볶을 때 달궈진 팬에 고기만 먼저 올려 뒤적이지 않고 잠시 두는 '마이야르 반응'입니다. 고기 표면이 노릇하게 눌어붙으면서 깊은 풍미가 생겨나요. 이 과정 없이 처음부터 뒤적이면 고기에서 물이 나와 맛이 밍밍해질 수 있으니, 센 불에서 한 면을 3~5분 정도 익힌 후 뒤집어주세요.
👨🍳 Directions
- 1
Completely pat dry 600g of pork shoulder (or pork leg meat) with paper towels to remove any blood. (Blood is a source of gamey odor in meat.)
- 2
Cut the patted-dry pork into bite-sized pieces.
- 3
Prepare a food storage container (airtight container) to make the sauce. (This helps minimize dishwashing.)
- 4
First, add 2 tbsp of sugar to the prepared container.
- 5
Add 3 full tbsp of soy sauce on top of the sugar.
- 6
Add 3 heaping tbsp of gochujang (고추장), mounding it up. (Do not level it off!)
- 7
Pour in an appropriate amount of pear juice/drink to create the base for the liquid sauce. (Pear juice/drink provides moisture, tenderizes the meat, and adds fructose.)
- 8
Close the container lid and shake well to thoroughly mix the sauce.
- 9
Add 1 tbsp of minced garlic to the well-mixed sauce and mix well again.
- 10
Add the pre-cut pork to the sauce. Spread it out well to prevent clumping, mix thoroughly, and let it marinate.
- 11
Add 2 tbsp of vinegar and mix again to ensure the meat and sauce are well combined.
- 12
Add 0.5 tbsp of sesame oil and mix lightly. (Be careful not to add too much.)
- 13
Diagonally slice the green onions and julienne the onion.
- 14
Gently place the sliced green onions and julienned onion on top of the marinated pork without mixing them in yet.
- 15
Sprinkle 1 pinch of salt over the vegetables to create a pickling effect. (This helps the vegetables stay crisp and prevents them from becoming soggy.)
- 16
Heat a pan and first add only the pork, stir-frying it. Do not stir the meat immediately; let it sit undisturbed for a moment until a slightly browned or charred surface forms. (This is for the Maillard reaction.)
- 17
Once the surface of the meat is darkly browned, stir it evenly and cook until fully done.
- 18
When the pork is almost fully cooked, add the vegetables that were set aside.
- 19
Pour all the remaining sauce liquid into the pan.
- 20
Close the pan lid and cook on low heat for 3 minutes until the sauce is slightly reduced and the dish is moist.
- 21
Finally, add 1 tbsp of minced garlic and mix well to elevate the flavor.
- 22
Sprinkle with black pepper to finish.
💡 Tips
Removing blood from pork is crucial to prevent gamey odors and maintain its fresh flavor.
When making the sauce, add ingredients in the order of sugar (powder) → soy sauce (liquid) → gochujang (paste) to easily create it with just one spoon.
Adding vinegar enhances the flavor with acidity and acts as a natural preservative, extending the dish's shelf life.
By first placing only the meat in the pan and letting it sit undisturbed for a moment to brown the bottom, you can achieve the Maillard reaction, which develops a deeper flavor.
📦 Storage & Reuse
완성된 제육볶음은 밀폐용기에 담아 냉장 보관 시 2~3일간 신선하게 즐길 수 있습니다. 다시 데울 때는 팬에 약불로 볶거나 전자레인지에 돌려주세요. 고기가 마르지 않도록 물이나 육수를 약간 넣고 데우시면 좋아요. 남은 제육볶음은 밥 위에 얹어 제육덮밥으로, 혹은 볶음밥 재료로 활용해도 아주 맛있습니다. 양념된 고기를 미리 재워두셨다면, 냉장고에서는 1~2일, 냉동실에서는 최대 한 달까지 보관 가능합니다. 냉동 시에는 소분하여 얼려두세요. 채소는 냉동하면 식감이 변하니, 고기만 양념하여 얼리고 채소는 조리 직전에 추가하는 것을 추천합니다.
🥢 Who This Is For
이 간편 제육볶음은 바쁜 일상 속에서도 든든하고 맛있는 한 끼를 원하는 모든 분들께 추천합니다. 특히 혼자 사는 자취생이나 요리 초보자분들도 쉽게 도전하여 성공적인 결과를 얻을 수 있을 거예요. 매콤달콤한 양념과 부드러운 고기가 어우러져 온 가족이 좋아하는 밥반찬으로도 손색이 없습니다. 따뜻한 흰쌀밥 위에 듬뿍 올려 제육덮밥으로 즐기시거나, 상추나 깻잎 등 신선한 쌈 채소와 함께 곁들이면 더욱 풍성한 식사를 즐길 수 있습니다. 시원한 콩나물국이나 계란찜을 함께 내면 완벽한 한식 밥상이 완성될 거예요.
🔥 Nutrition Info
이 제육볶음은 1인분(돼지고기 약 150g 기준)으로 환산했을 때 약 400~450kcal 정도의 열량을 제공합니다. 주재료인 돼지고기 앞다리살은 1인분 기준 약 30~35g의 단백질을 함유하고 있어 근육 유지와 에너지 생성에 도움을 줍니다. 지방은 약 20~25g, 탄수화물은 양념과 채소를 통해 약 35~40g을 섭취할 수 있습니다. 특히 돼지고기는 철분과 비타민 B군(특히 B1)이 풍부하여 빈혈 예방 및 피로 해소에 효과적입니다. 양파와 대파는 비타민 C와 식이섬유를 더해주어 영양 균형을 맞춰줍니다. 다만, 간장과 고추장을 사용하므로 나트륨 함량이 다소 높을 수 있으니, 밥과 함께 드실 때에는 곁들이는 다른 반찬의 간을 조절하시는 것이 좋습니다.
💬 Comments
No comments yet. Be the first to comment!